How to draw a Shield. The war of old was very different from what it is today. But just because the tools were a little less advanced back then doesn’t mean they were less deadly! History is full of devastating weapons that were used, and often a good shield could mean the difference between life and death. They also came in different shapes and sizes depending on the era and nation that used them, and learning how to draw a shield is a great way to imagine what your own would look like!
It is your companion if you are a fan of old shields and spears. Our step-by-step guide on drawing a shield will show you how to draw your awesome shield. If you are looking for coloring pages, then you are at the right place because we share many types of kids coloring pages like Christmas coloring pages, Halloween coloring pages, dog coloring pages, cat coloring pages, dragon coloring pages, horse coloring pages, and many more.
Drawing a Shield
Step 1:
The piece we will outline in this guide on how to remove a shield darts like a Viking guard. These shields were small and round, so that’s what we’ll draw as an outline in this first step. Using a tool like a drawing compass would be much easier to create the outer circle. Be sure to leave some space at the top right of the shield for reasons you’ll find out in a moment! Then finish by drawing two more circles in the center of the shield. Then go to step 2!
Step 2:
Now we’ll start laying the groundwork for the final details of your shield drawing. First, mark another circle around the inner edge of the shield drawing. Then you’ll see why we left that space in the outline: You can use jagged lines for a hole in the shield, probably where a sword broke it!
Next, we’ll draw a grid using straight lines inside the outline of the shield. Finally, you can draw a shape inside the circular center of the shield to show how light shines on it. You can reproduce the shape straight from the reference picture to help!
Step 3:
Part three of our guide on how to draw a shield will see you add more detail. First, draw slightly jagged lines in the center circle of the shield for some small indentations from past battles. This shield has certainly been put to good use! Finally, draw a few small black shapes along the perimeter of the center circle between it and the surrounding circle. These will serve as the bolts that hold the shield together.
Step 4:
This shield drawing is already awesome! We will make it even better in the next steps with more details. We’ll add more bolts than you drew in the last part. These will go close and about the outer periphery of the security. Next, we’ll add some shading details inside the center circle of the shield. These details will consist of a thin line at the top and a thicker line at the bottom. Finally, we’ll add more lines to the grid shape we started in a previous step to make it even more dynamic. We’ll finish the final details in the next step, so let’s move on!
Step 5:
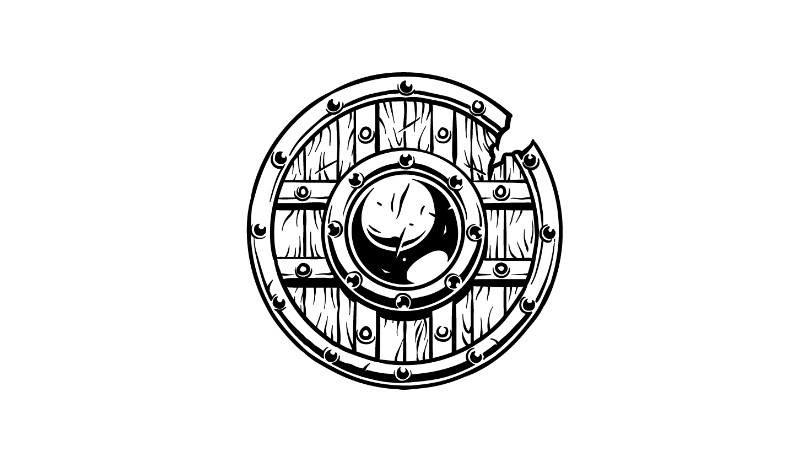
Before adding color to your image, we will first add some final details and elements in this step of our guide to drawing a shield. You can do this by adding a few small wavy lines to the part of the shield that would be wooden. It will help give it an even more woody look! You can add broken lines throughout this area for more chips and notches.
Once these details are added, you can add your additional elements to complete it. A fun thought would be to find Viking blades or axes and draw one with this security. You can even create a scene or draw someone holding the security and ready for action! Try these ideas, but get creative by going further in this drawing!
Step 6:
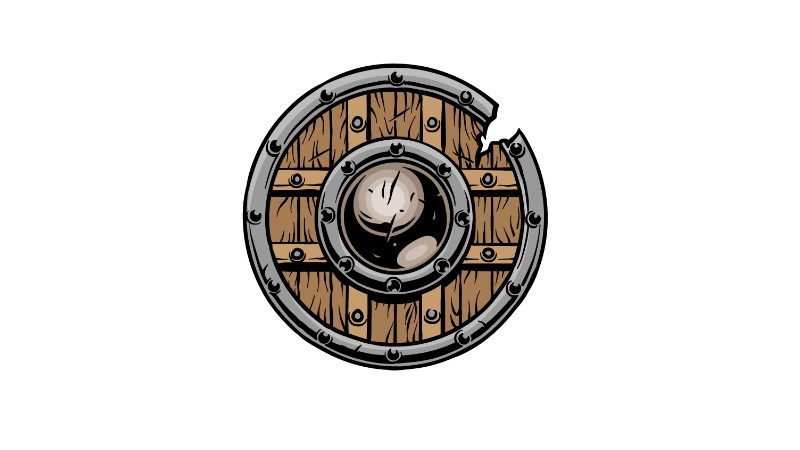
It is the last part of your shield drawing, and you can finish it with cool colors in this one. In our reference image, we’ve gone with different shades of gray for the metal parts of the shield. Using different shades, you can make the metal look slightly more realistic! Similarly, we also use more than one shade of brown for the wood looks. Remember to color the little studs and fingernails too! Once you have chosen all the colors you wish to use, choosing your artistic medium will only be a question. You can use acrylic and aqua paints.
Tips to make drawing your shield easier!
Find out how you can make this easy-to-draw shield even easier with some fun tricks! We’ve added many amazing details to this shield drawing, including the wear on metal and wood parts. These details are all extras that make the shield even better. While they’re a great addition, they are unnecessary to the overall shield drawing. So if you find it difficult to draw them, you can remove some of those extra details. They look great on the shield, so removing as little as possible is recommended.
Try to stick to the areas you specifically struggle with and keep the ones that aren’t giving you any trouble. Another way to make drawing this shield easier would be to incorporate it into a larger drawing. You might assume that adding to the image is a good way to make the image harder, but that’s not necessarily the case! For example, draw a simple cartoon Viking warrior holding this shield. If so, you could draw it in any style you want and then adapt the shield to the same style. It would be a great way to simplify your shield drawing while adapting to the scene you want to create.
What kind of technology could you utilize for this security sketch? Finally, you can use additional artistic tools and techniques to help create this shield drawing. There are many round shapes on this shield, so we mention using a drawing compass for the outlines. If you don’t have one available, you can use round objects for tracking. These can be found around the house and include jar lids or other items. Draw around them, and you’ll have perfect circular outlines for your shield! If you know of other tools and techniques, do that too.
Your shield drawing is complete!
We hope working through this guide to drawing a shield has been smooth for you! There were a lot of shapes and details to fix in this drawing, so we hope the different steps made it easier for you. Remember that you can add details and elements to the shield, background, and color options! Just be sure to have fun and see what happens.
However, the fun doesn’t stop there; you can find more guides on our website. We often upload new ones, so live, sure to reach back! Once you’ve finished your shield drawing, we hope you’ll share it on our Facebook and Pinterest pages for us to see!
Also Read: A Beginner’s Guide to Vape Juice Flavors